Tractus-X Jira Xray Tutorial
1. Introduction and Prerequisites
- This is a tutorial on how to create and structure test cases, test sets and test plans in the central Eclipse Tractus-X Test Management Jira test management system.
- This test management system is mainly intended to manage and execute tests at the end-to-end integration testing level, but can be used by the Tractus-X projects for tests at any test level.
- This test management system is an Atlassian Jira installation (Cloud version), with Xray - Test Management for Jira installed as an application in it.
- The Atlassian Jira subscription for the project was originally purchased by Catena-X e.V. Thus please note that all links below currently still have the name Catena-X in the URL, as this could not be changed without causing further issues. But this test management system can now be used free of charge by Eclipse Tractus-X test management and product teams for their testing purposes after an Atlassian Open Source Cloud Subscription for open source projects was granted by Atlassian Pty Ltd to the Eclipse Foundation respectively the Eclipse Tractus-X project.
- Similar to permissions used in the Eclipse Tractus-X GitHub, the system is set up so that viewing access to the Eclipse Tractus-X Test Management Jira project space is possible without creating an account.
- However in order to add, edit or delete test assets in the repository you will need a Jira account and the applicable permissions assigned by an administrator: Project access granted and project role "Contributor" to edit assets created yourself with your account or "Committer" to also edit assets of other team members and projects.
- To work with Xray test management in Jira, create a Jira account or log in and contact Tractus-X / Catena-X e.V. Test Manager Monika Jacobsen to get added as a Jira project member.
Please see the sections below for a tutorial on how you can use this system to achieve the testing requirements and objectives for your Tractus-X project.
2. Accessing the Xray Testing Board and Create Button
- Navigate to Tractus-X Testmanagment Jira project.
- Open the Xray Testing Board from the left sidebar under "Apps" → "Xray" → "Testing Board".
- Locate the "Create" button:
- Use the global "Create" button at the top of the page, or
- The context-specific "Create" button on the right side within the Testing Board.
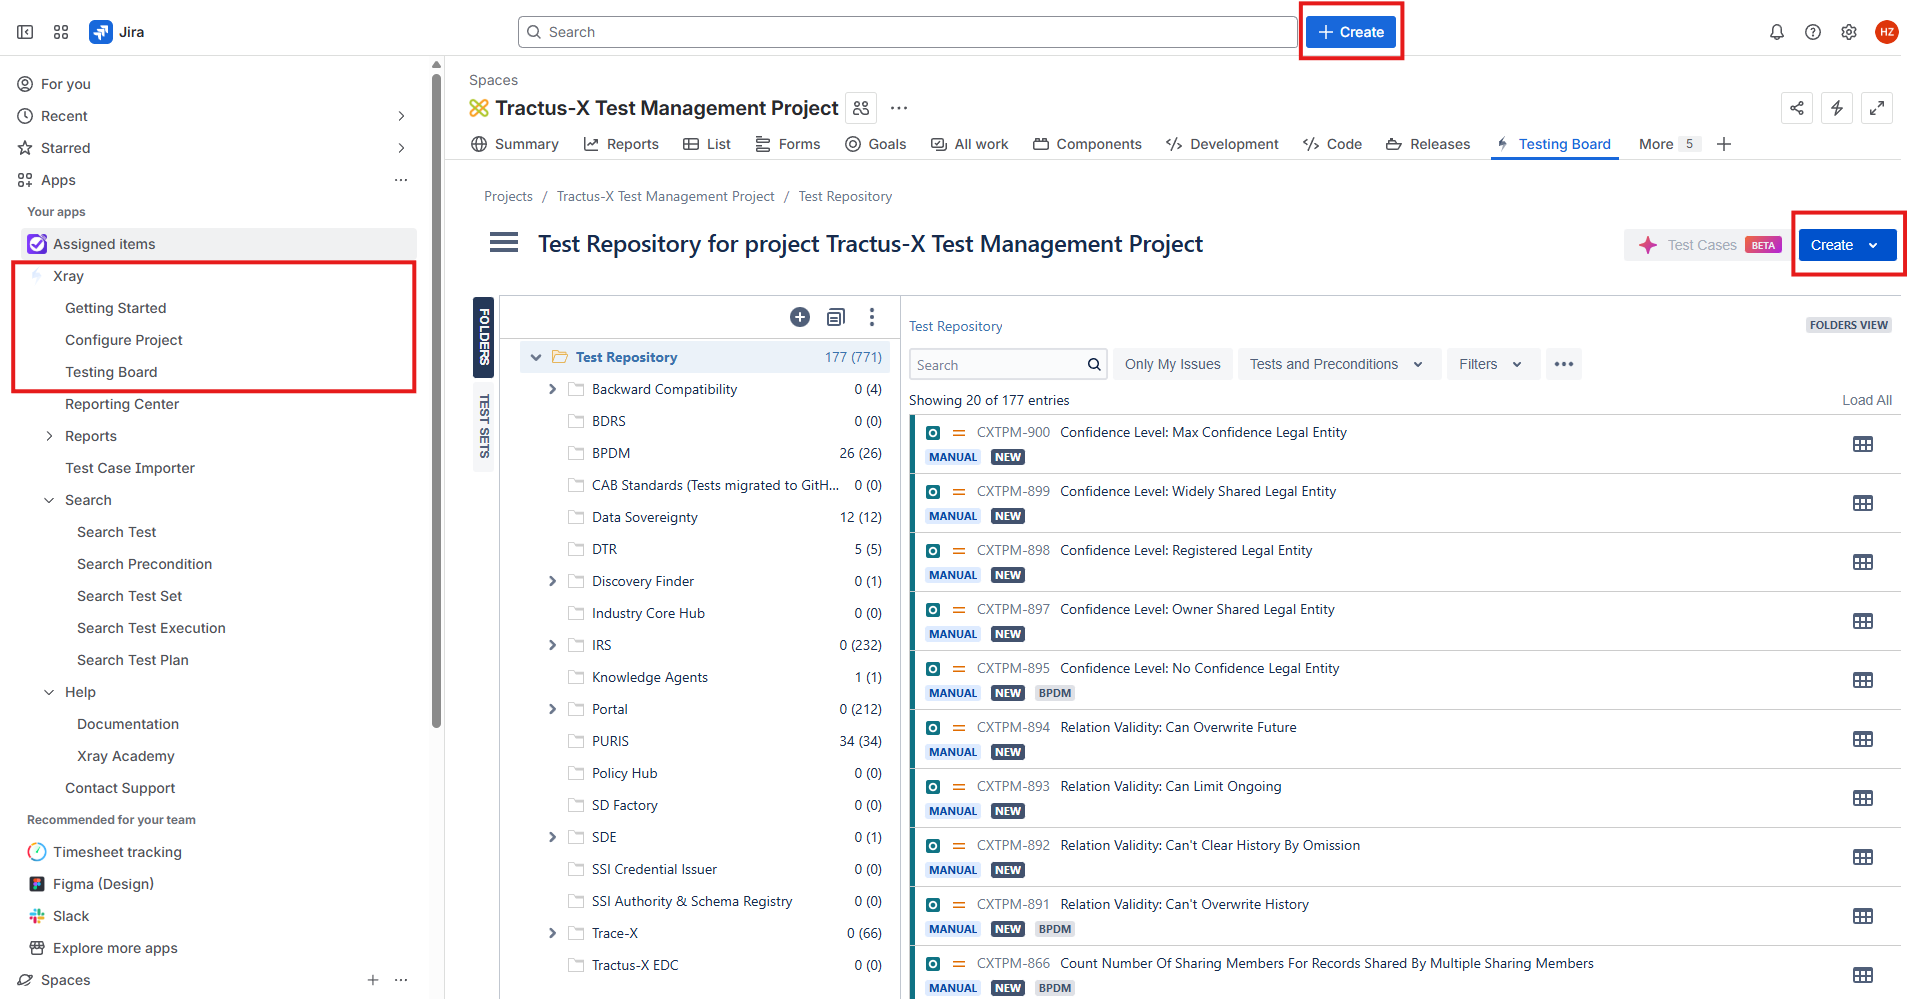
Screenshot: The "Create" buttons are highlighted in the Jira Xray interface for easy access to create new test artifacts.
3. Creating Test Cases
Jira Xray supports multiple test types, each suited for different testing approaches.
3.1 Basic Test Case Creation
For all kinds of test types, you need to fill out these basic information.
- Click the Create button.
- In the creation dialog, select Test as the Work type.
- Fill in all relevant fields. Fields marked with an asterisk are mandatory, e.g. a Summary (= title of the test)
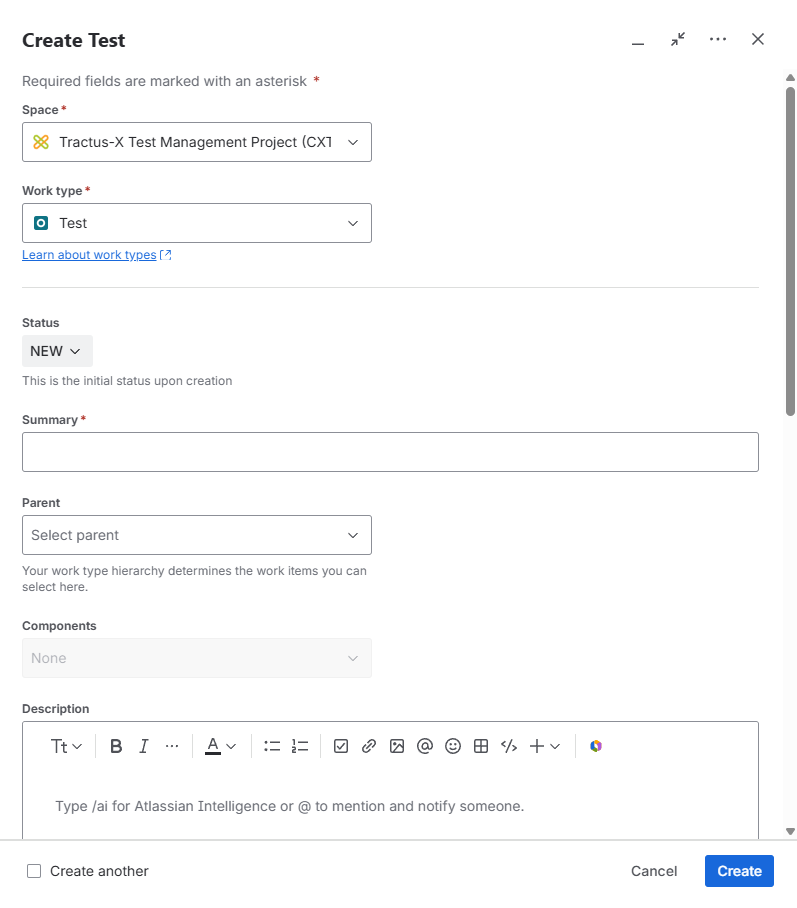
Screenshot: Top of the "Create" dialogue box with Test selected as the "Work type" and the "Summary" field highlighted
Summary: Brief description of the test
A good Jira Xray test case summary should clearly indicate the system and use case it belongs to. This should be done by including the system in square brackets followed by a short, descriptive title of what the test does.
Examples:
- [Portal Frontend] User can reset password via email
- [BPDM] Validate mandatory field error handling
Description: Detailed explanation of the test
A good Jira test case description should briefly explain the purpose and context of the test. It should include:
- What is being tested (feature, functionality, behavior)
- Why it’s important (business or technical relevance)
- Any setup or dependencies required (e.g., test data, user roles)
Example:
- This test verifies that a user can successfully reset their password via the Portal Frontend using the "Forgot Password" function.
- The test ensures that a valid reset link is sent via email and that the new password can be used for login.
- Precondition: A user account with valid email must exist.
Labels: For categorization
The Labels field in a Jira test case should be used to support filtering, grouping, and reporting by product, use case, or environment. Labels should be:
- Consistent and lowercase
- Focused on system/module, test type, or team/responsibility
- Avoid spaces (use dashes or underscores)
Examples:
- portal-frontend
- regression
- stable-environment
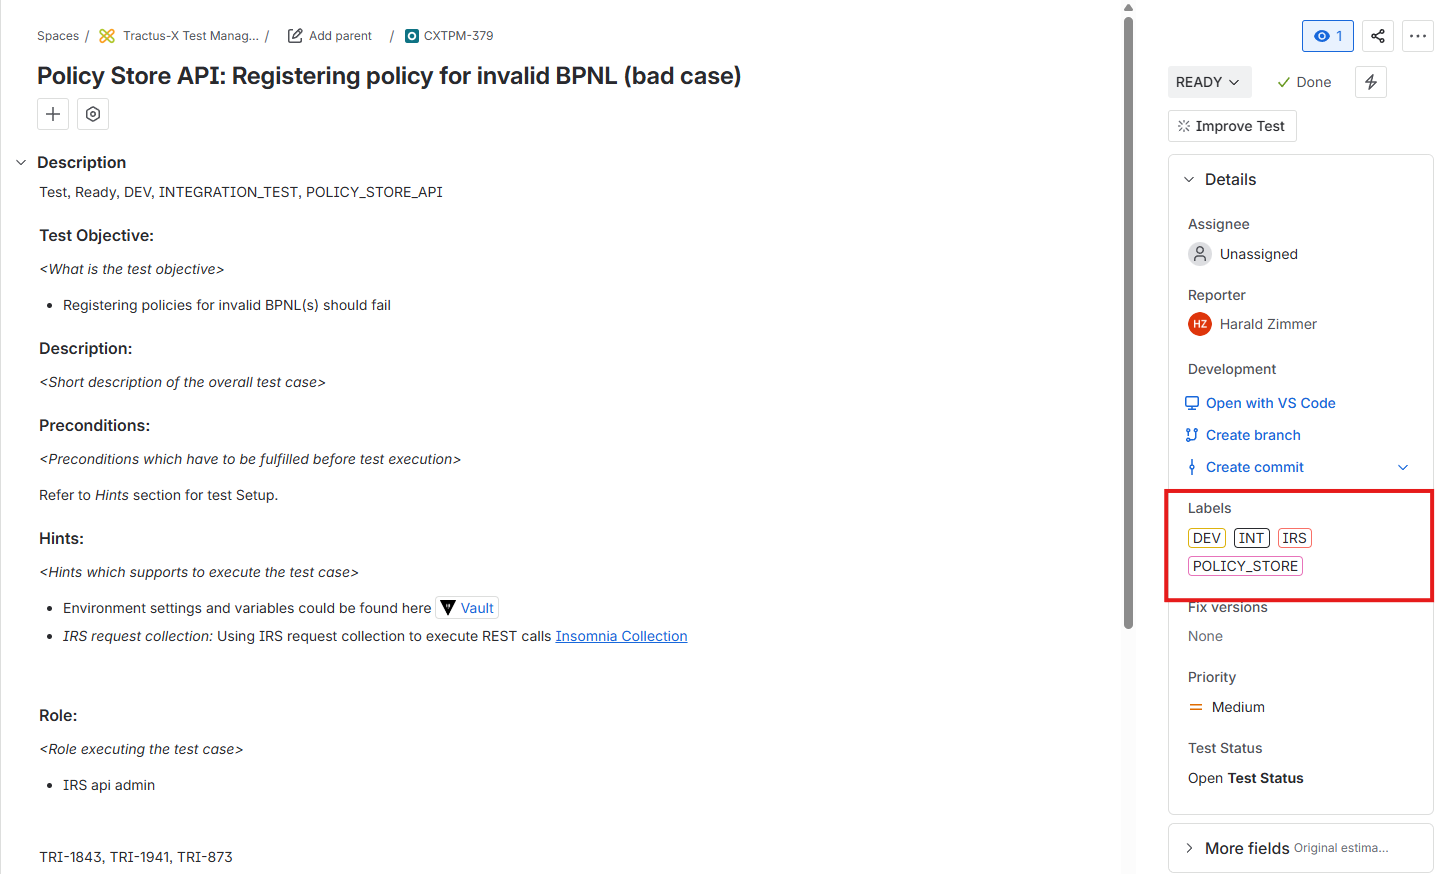
Screenshot: Setting the right labels helps to find, group, and associate this issue to Policy Store API of the IRS on the Integration Environment.
Fix Versions: Specify relevant releases
The Fix Versions field should be used to indicate the release or version for which the test case was created or is valid. This helps in:
- Tracking test coverage per release
- Filtering test cases relevant to a specific version
- Reporting test readiness and execution progress for releases
You can find all available fix versions in the Release versions overview
Component, Team: (see Section 10 for details)
The Component field should indicate the technical module or system the test case belongs to. It helps with:
- Grouping tests by functionality or architecture
- Assigning ownership (component leads)
- Filtering and reporting by system areas
Examples:
- Portal Frontend
- BPDM
The Team field should indicate the team responsible for creating, maintaining, or executing the test case. It ensures:
- Clear ownership
- Easier assignment and collaboration
- Efficient filtering, reporting, and test planning per team
Examples:
- Testmanagement
- Portal
- PURIS
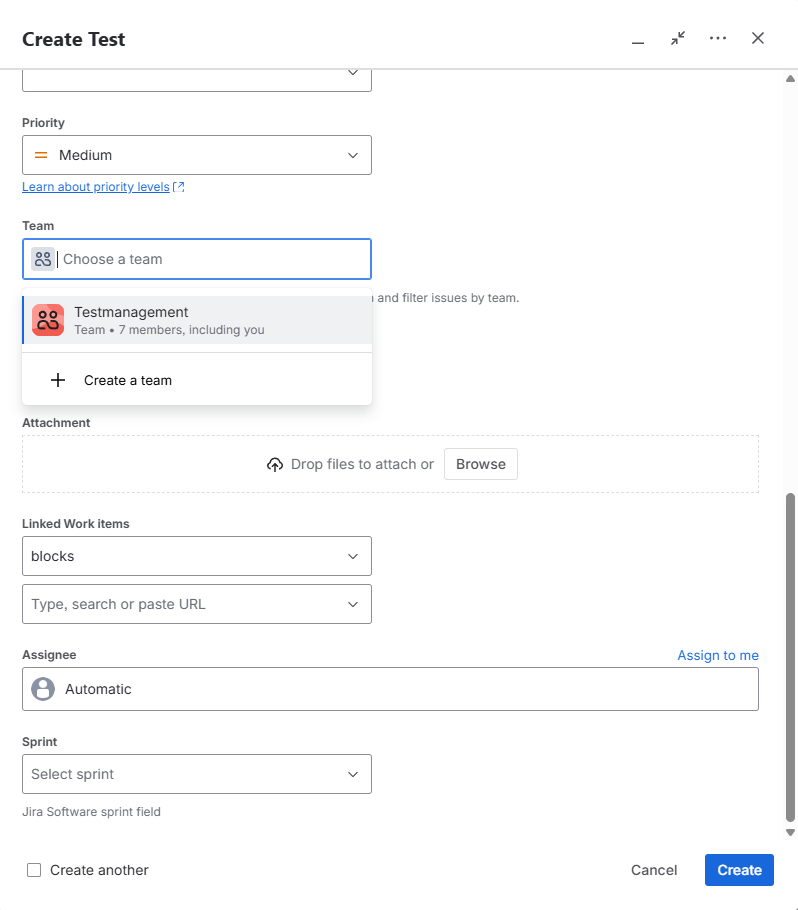
Screenshot: Bottom part of the first "Create" dialogue screen with the "Team" selection dropdown menu.
On the second screen, please add the test type:
- Test Type: Manual, Cucumber, or Generic.
Depending on your choice, Jira will change the layout and offer you different options to describe your test case.
3.2 Manual Test Type
- Purpose: For test cases executed manually by testers
- Use Case: UI testing, exploratory testing, user acceptance testing
- Structure: Sequential test steps with actions, test data, and expected results
- Example Scenario: Testing user login functionality
Creating Manual Test
- Select Test Type = Manual
- Add structured test steps with:
- Clear, actionable instructions
- Specific test data
- Precise expected results
- Include attachments (screenshots, test data files)
Manual Test Steps Example:
Step 1:
Action: Navigate to the login page
Test Data: URL:
https://app.catena-x.net/loginExpected Result: Login page is displayed with username and password fields
Step 2:
Action: Enter valid credentials
Test Data: Username:
test.user@catena-x.net, Password: SecurePass123Expected Result: Credentials are accepted without validation errors
Step 3:
Action: Click the "Login" button
Test Data: N/A
Expected Result: User is redirected to the dashboard page
Template (Manual)
You can follow these instructions or clone from the template test case. For manual test cases, please open CXTPM-672. From the three-dots-menu, choose Clone and adapt the fields accordingly.
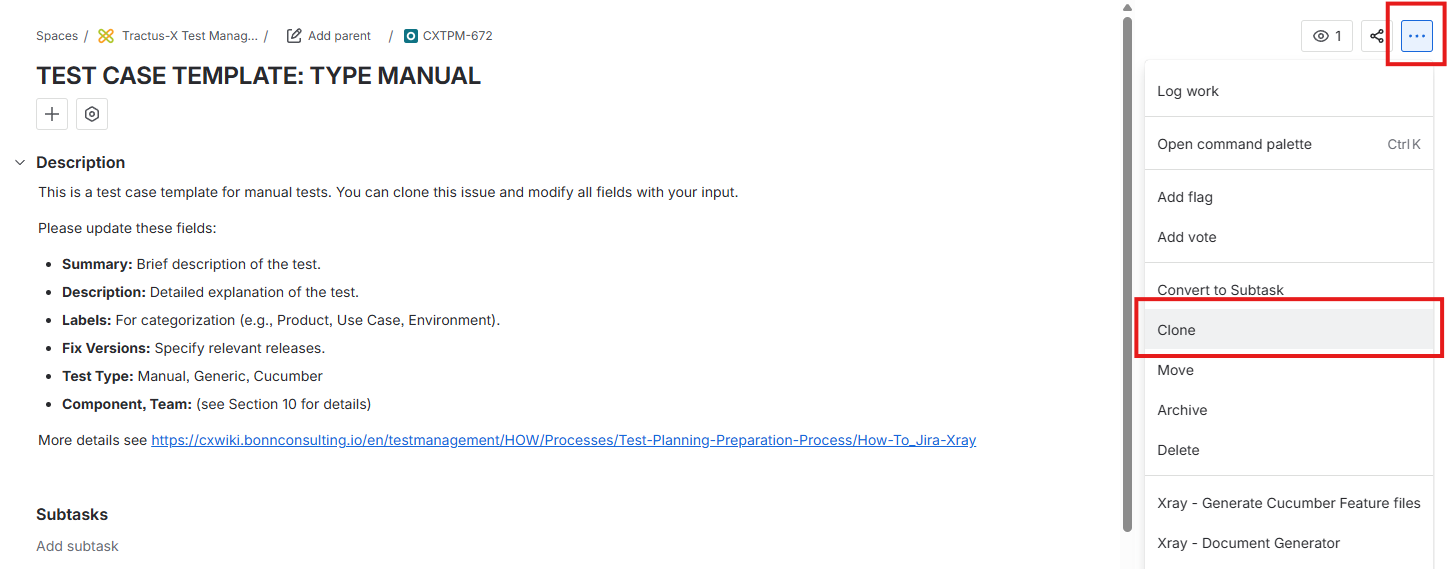
Screenshot: Clone from the template for a manual test case
3.3 Cucumber Test Type
- Purpose: For Behavior-Driven Development (BDD) tests
- Use Case: Automated testing with business-readable scenarios
- Structure: Gherkin syntax (Given, When, Then)
- Example Scenario: API endpoint validation
Creating Cucumber Test
- Select Test Type = Cucumber
- Write scenarios using proper Gherkin syntax
- Ensure scenarios are executable by automation framework
- Include data tables and scenario outlines for data-driven tests
Cucumber/Gherkin Syntax Example:
Feature: Asset Creation in Trace-X
  As a supply chain manager
  I want to create new assets in the system
  So that I can track components through the supply chain

  Background:
    Given the user is authenticated with valid credentials
    And the user has "Asset Creator" permissions
    And the system is connected to the asset registry

  Scenario: Create a valid asset with all required fields
    Given the user is on the asset creation page
    When the user enters the following asset details:
      | Field          | Value                    |
      | Asset ID       | ASSET-2025-001          |
      | Asset Name     | Transmission Component   |
      | Manufacturer   | BMW Group               |
      | Serial Number  | TX-BMW-789456           |
      | Category       | Automotive Part         |
    And the user clicks the "Create Asset" button
    Then the asset should be successfully created
    And the system should display confirmation message "Asset created successfully"
    And the asset should appear in the asset registry
    And the asset should have status "Active"

  Scenario: Attempt to create asset with missing required fields
    Given the user is on the asset creation page
    When the user enters the following incomplete asset details:
      | Field          | Value                    |
      | Asset Name     | Incomplete Component     |
      | Manufacturer   | BMW Group               |
    And the user clicks the "Create Asset" button
    Then the system should display validation error "Asset ID is required"
    And the asset should not be created
    And the user should remain on the creation page

  Scenario Outline: Create assets with different categories
    Given the user is on the asset creation page
    When the user creates an asset with category "<category>"
    And all other required fields are filled with valid data
    Then the asset should be created successfully
    And the asset category should be set to "<category>"

    Examples:
      | category           |
      | Automotive Part    |
      | Electronic Module  |
      | Raw Material       |
      | Finished Product   |
Gherkin Syntax Explanation:
- Feature: High-level description of the functionality being tested
- Background: Common setup steps that apply to all scenarios in the feature
- Scenario: Individual test case with specific conditions and expectations
- Given: Preconditions and setup (arranges the test environment)
- When: Actions performed by the user or system (acts on the system)
- Then: Expected outcomes and verifications (asserts the results)
- And/But: Additional steps that follow the same context as the previous Given/When/Then
- Scenario Outline: Template for multiple similar scenarios with different data
- Examples: Data table providing values for scenario outline placeholders
Template (Cucumber)
You can follow these instructions or clone from the Cucumber template test case. For a Cucumber test case template please open CXTPM-673. From the three-dots-menu, choose Clone and adapt the fields accordingly.
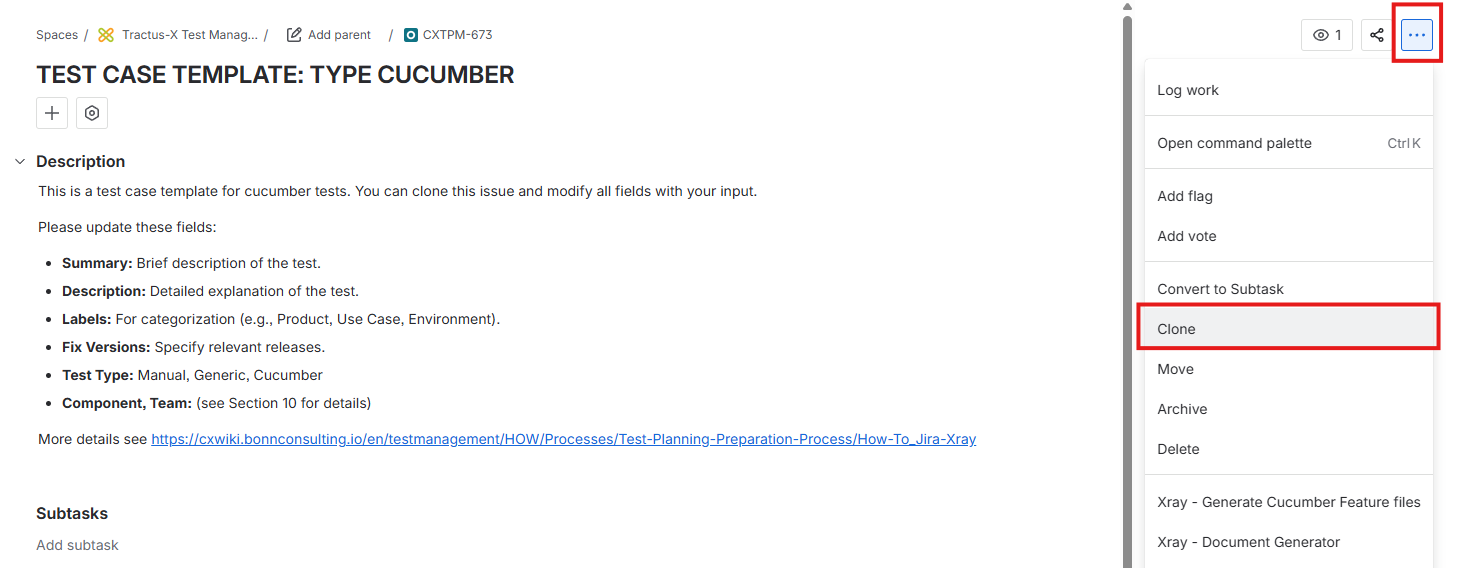
Screenshot: Clone from the template for a Cucumber test case
3.4 Generic Test Type
- Purpose: For reusable test cases that don't fit specific patterns. Results may come from tools which Xray does not natively support.
- Use Case: Configuration tests, environment setup, general validation
- Structure: Flexible format, can be structured or unstructured
- Example Scenario: System configuration validation
Creating Generic Test Cases
- Select Test Type = Generic
- Provide a clear description of what needs to be tested
- Include any specific conditions or configurations
Generic Test Example
Summary:
[DTR] Performance Validation of /lookupById API
Description:
This test validates that the /lookupById endpoint of the Digital Twin Registry responds within acceptable performance thresholds under load. Executed via Apache JMeter in a CI pipeline.
Preconditions:
- Endpoint is deployed and reachable
- JMeter script available in CI repository
- Required test data exists in the registry
Expected Result:
- 95% of responses complete within 500ms
- No 5xx status codes returned
- Error rate < 1%
Test Execution:
- Test is executed externally via GitHub Actions
- Results (JMeter .xml or .json) are uploaded via the Xray REST API to the corresponding Test Execution
4. Test Sets
The Xray Test Set is used to group related tests for better organization and reuse.
4.1 Purpose Of Test Sets
- Logical grouping of Test issues (e.g., by feature, module, or type).
- Reuse the same set of tests across different Test Plans or Executions.
- Simplifies bulk operations like assigning, executing, or reporting on tests.
4.2 Creating Test Sets
- Click the Create button.
- In the creation dialog, open the Work type dropdown and select Test Set.
- Fill in the fields, those marked with an asterisk are mandatory:
- Summary: Name of the Test Set.
- Description: Brief description of the Test Set.
- Labels, Fix Versions, Component, Team, Priority: For categorization and traceability. For a detailed explanation of these fields see chapter 3.1 Basic Test Case Creation
- Click Create to finalize the Test Set.
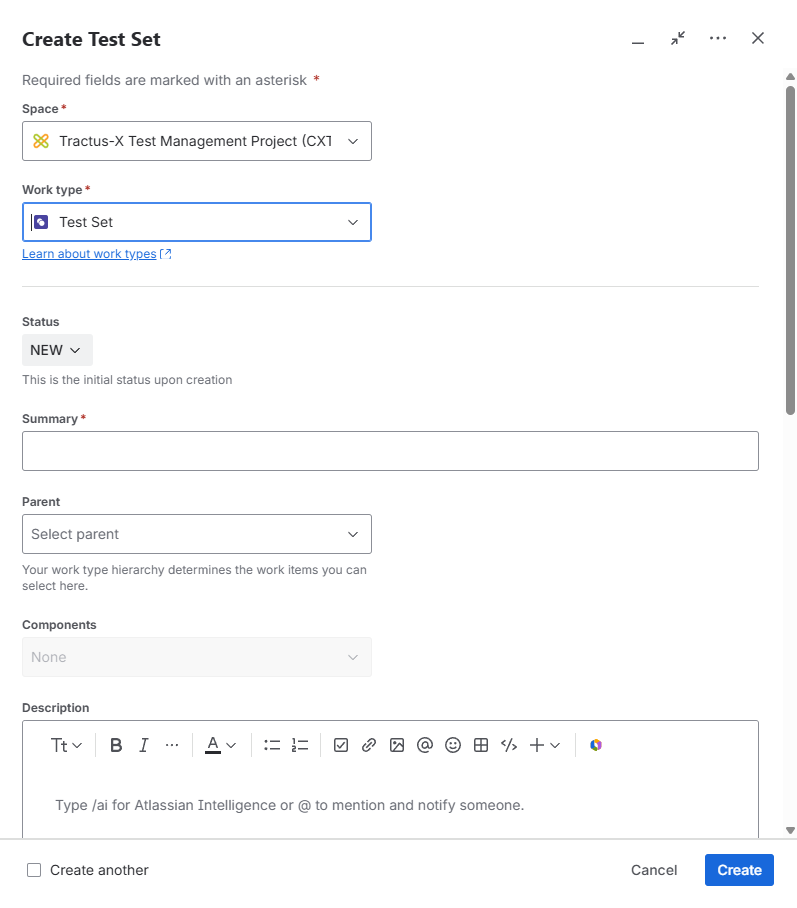
Screenshot: The "Work type" dropdown is highlighted, showing "Test Set" selected in the creation dialog.

Screenshot: The "Fix version", "Priority", "Team" and "Labels" dropdowns are highlighted in the "Create" dialogue box.
4.3 Adding Test Cases to Test Sets
- Open the created Test Set.
- Use the Add Tests option to include existing test cases, or create new test cases directly within the Test Set.
- Assign priorities and link the Test Set to requirements or defects for traceability.
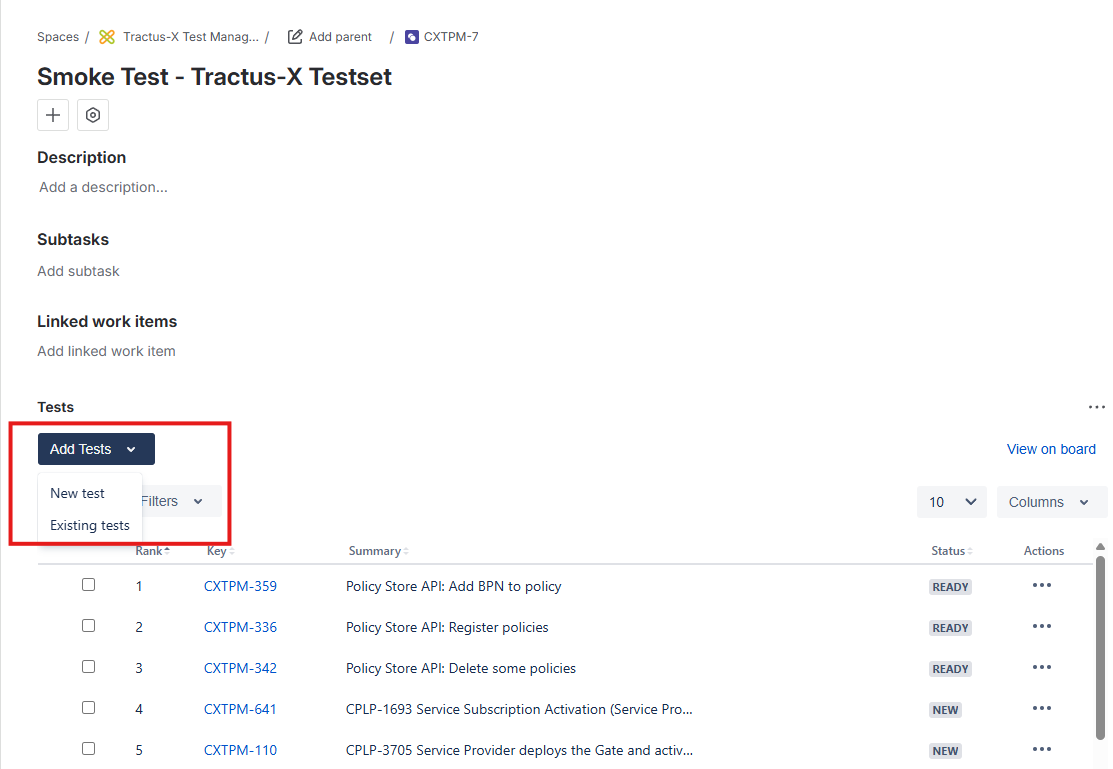
Screenshot: Add new or existing tests to a test set
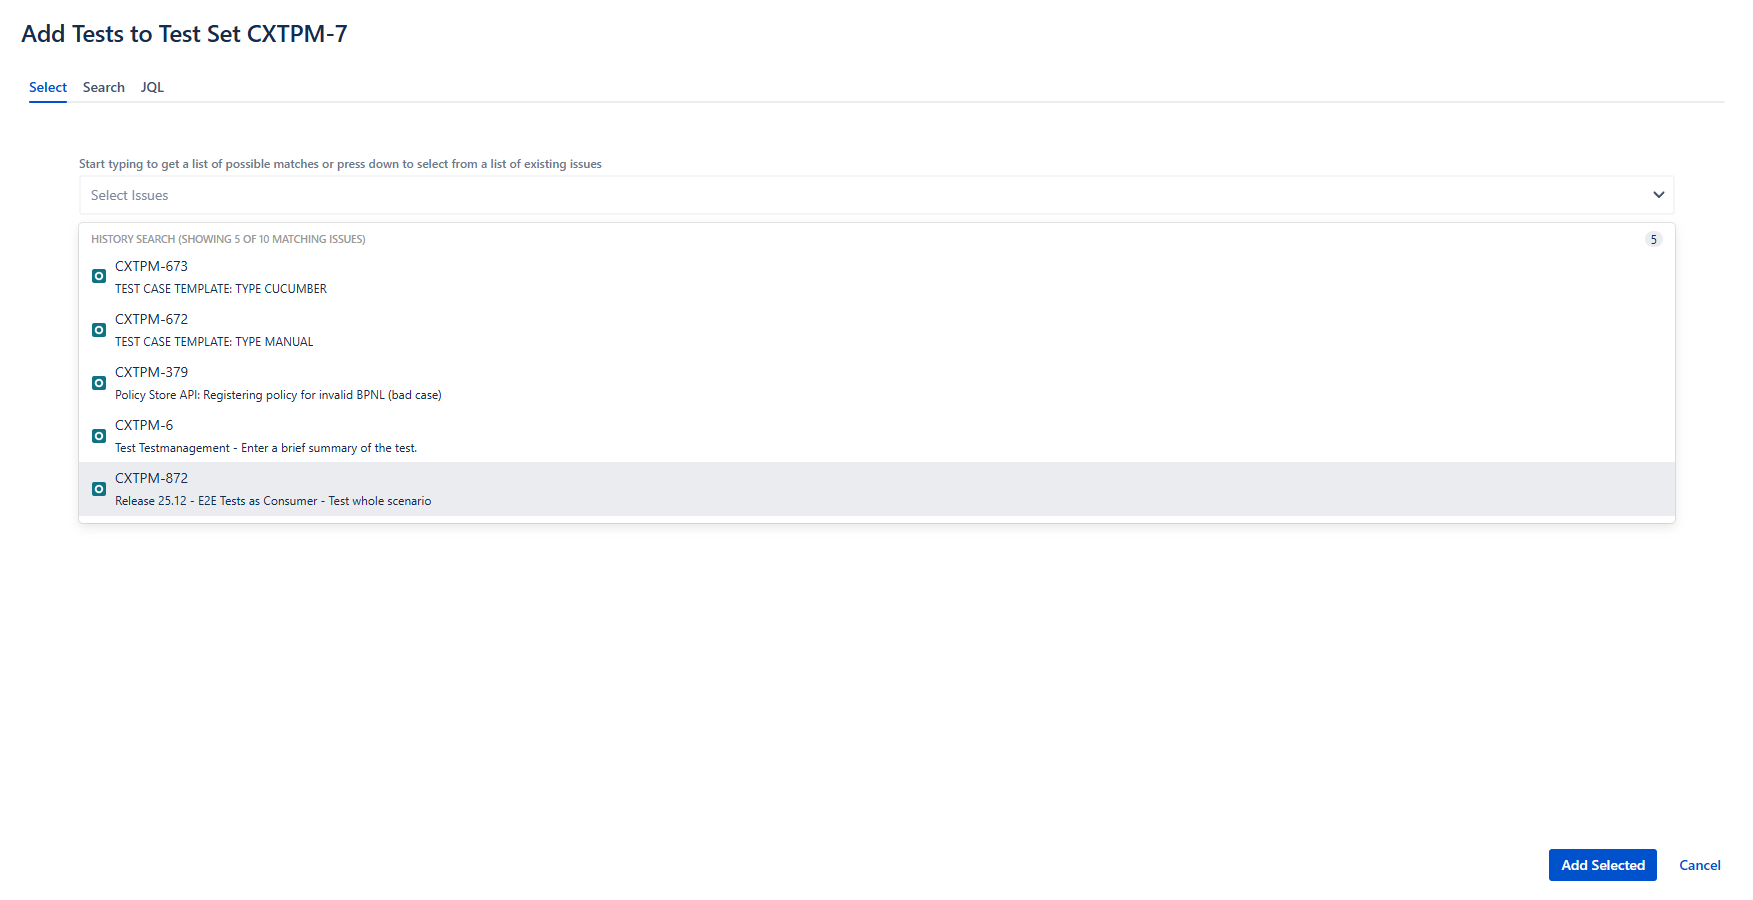
Screenshot: Add existing test from the list or use the more sophisticated search
5. Test Plans
The purpose of an Xray Test Plan is to organize and manage the execution of a set of tests for a specific goal, like a release, sprint, or feature validation.
5.1 Purpose of Test Plans
- Organize and manage a collection of Test Executions targeting a common objective (e.g., a release or sprint).
- Track overall testing progress, status, and coverage in one centralized view.
- Define the scope of testing by associating relevant Test issues.
- Allow for multiple executions of the same test set within the same plan (e.g., different environments or iterations).
- Enable reporting and metrics like pass/fail rates, execution history, and requirement traceability.
5.2 Creating Test Plans
- Click the Create button.
- In the creation dialog, open the Work type dropdown and select Test Plan.
- Fill in the fields, marked with an asterisk are mandatory:
- Summary: Name of the Test Plan.
- Description: Brief description of the Test Plan.
- Labels, Fix Versions, Component, Team: For categorization and traceability. For a detailed explanation of these fields see chapter 3.1 Basic Test Case Creation
- Click Create to finalize the Test Plan.
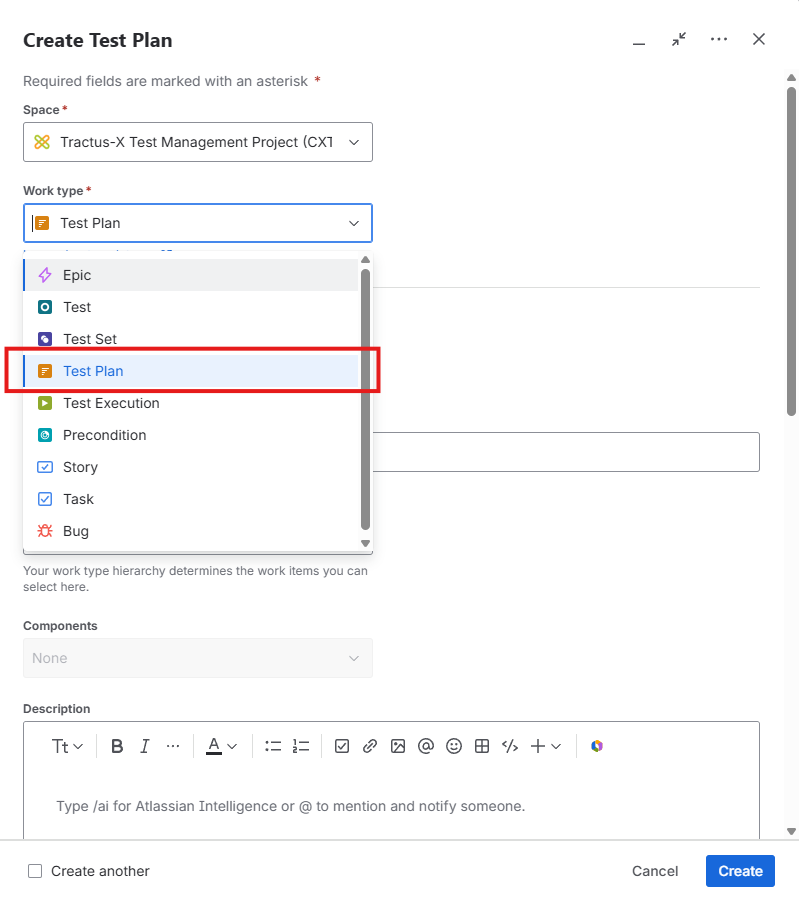
Screenshot: In the "Create" menu the "Work type" dropdown with "Test Plan" as the selected option is highlighted.
5.3 Integrating Test Sets into Test Plans
- Open the created Test Plan.
- Use the Add Test Sets or Add Tests option to include relevant Test Sets or individual Test Cases.
- Organize and track the execution of your tests for a release or feature.
NOTICE
This work and all embedded screenshot images are licensed under the CC-BY-4.0.
- SPDX-License-Identifier: CC-BY-4.0
- SPDX-FileCopyrightText: 2025, 2026 Contributors to the Eclipse Foundation
- Source URL: https://github.com/eclipse-tractusx/eclipse-tractusx.github.io/
- Source URL: https://github.com/eclipse-tractusx/eclipse-tractusx.github.io/tree/main/docs/oss/howto-xray.md
- Images: https://github.com/eclipse-tractusx/eclipse-tractusx.github.io/tree/main/docs/images